GitHub Integration with Salesforce using OAuth 2.0 - Part 2
In the previous article, we read about the benefits of a Salesforce-Github Integration and how it can add value to the deployment pipeline of any organization. Moreover, we discussed about using connected apps for Authentication using OAuth 2.0 and how we can control the access easily and maintain a level of abstraction in the authentication process. In this blog we will be talking about how to use the Connected app to create connection and perform REST API calls.
The web application flow
Since we are using a connected app, we have to initiate a web application flow for authentication.The flow is often called as 3-legged OAuth in some cases because of the multiple REST API calls(usually 3) which are required to complete the authentication.The state diagram below illustrates how the connection is established. Here, the client is Salesforce and the Authorization as well as resource server are represented by GitHub.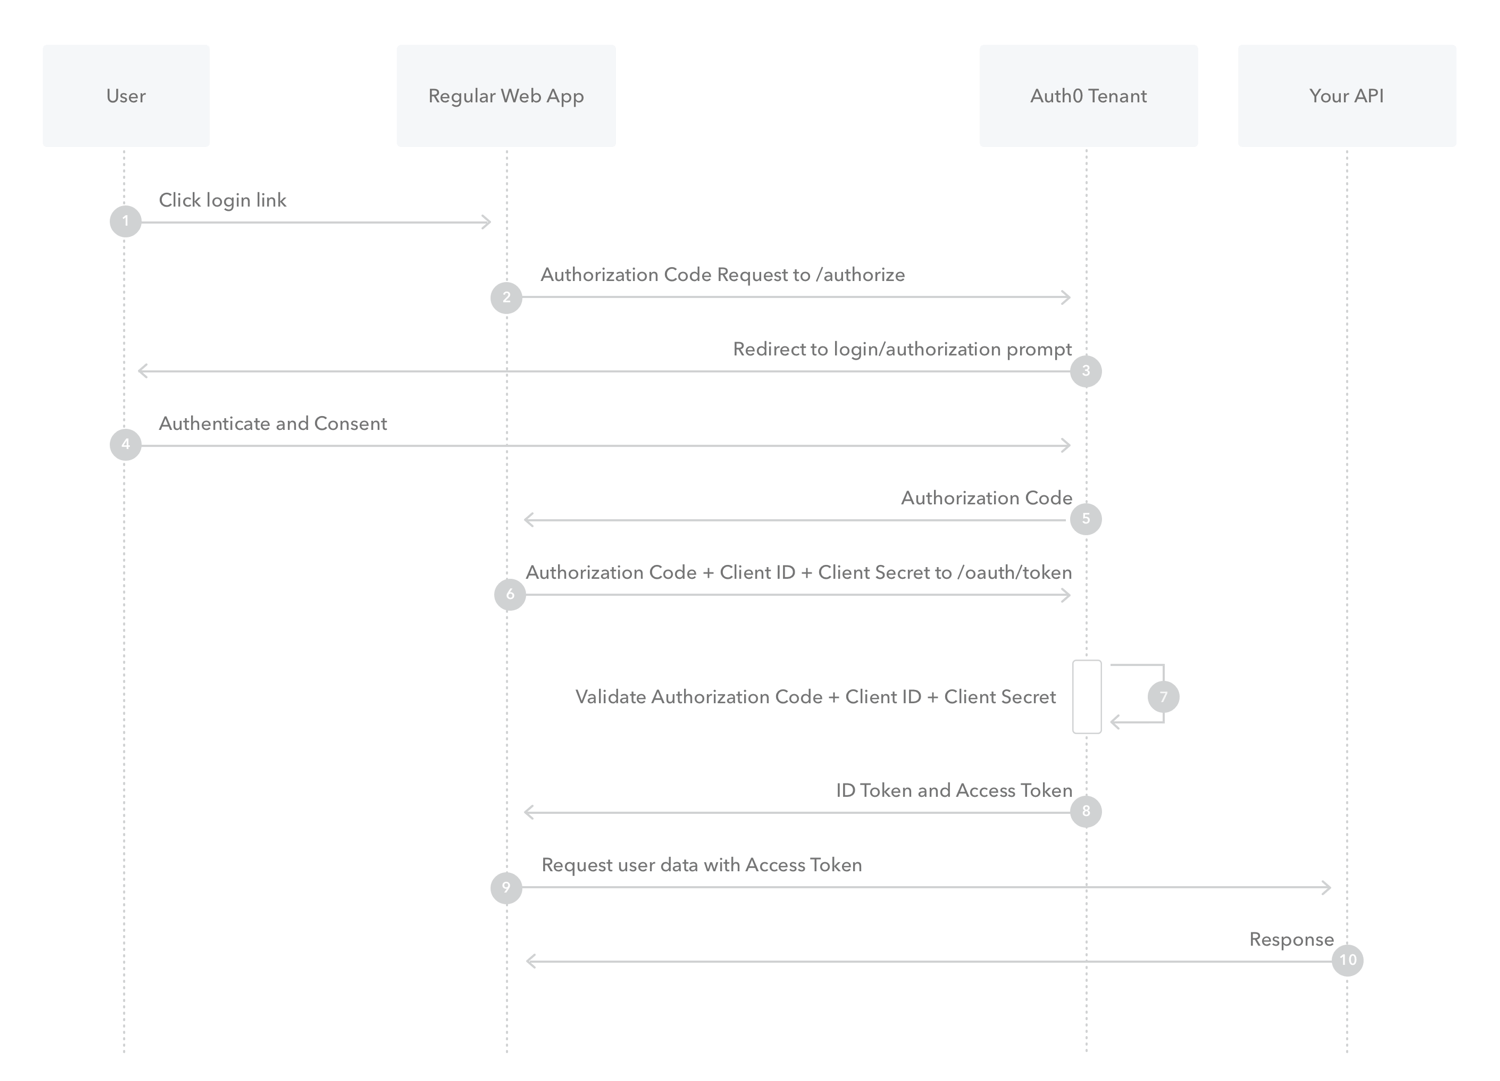
- The first step requires a redirection to the GitHub authorization server along with certain parameters like client id, redirect URI, scope etc.
Map<String, String> Params = new Map<String, String>
{
'client_id' => <<Client Id>>,
'redirect_uri' => <<Redirect URI>>,
'state'=><<Any random string of your choice>>,`
'scope'=>'repo,user'`
};
PageReference ref = new PageReference('');
ref.getParameters().putAll(Params);
There are a couple of things that we have to keep in mind here, Firstly, since we have to provide parameters with the url, we can either do that using a map or we can add them as a part of the url itself. Secondly, the scope variable controls a user's access to resources, one can choose an appropriate scope by referring to GitHub Documentation.
-
As this is a page reference method, it will open a new page and will take us to the GitHub authorization page.Once we approve or give the access, it will come back to the redirect URI provided. We will see that that URL in our browser window, along with the page url, will have two parameters attached to it, namely, Code and State. The code will be the Authorization code provided by GitHub while State will be the same string that we provided as a part of URL parameter. We will have to retrieve the parameters,using the following methods, and will use them in our next API call.
ApexPages.currentPage().getParameters();will retrieve a map of all the parameters. However, if we want to get a specific parameter(Ex. code in our case) from the URL, we can use-ApexPages.currentPage().getParameters().get('code');. -
Since, post redirection the call comes back to the page that we have provided, we have to make sure that the page performs an onload function or we can also use the action attribute of a page to call a method which retrieves the code from the URL. We can use an If statement inside the controller to check whether the code parameter of the URL is null or not.
<apex:page controller="*********" action="{!sampleMethod}">
</apex:page>
Alternatively, we can also use Java-script to accomplish the same.
The code inside the controller can be something like this -
public pagereference sampleMethod()
{
    String code=ApexPages.currentPage().getParameters().get('code');
    if(code==null)
    {
        Map<String, String> Params = new Map<String, String>
        {
            'client_id' => <<Client Id>>,
            'redirect_uri' => <<Redirect URI>>,
            'state'=><<Any random string of your choice>>,
            'scope'=>'repo,user'
        };
        PageReference ref = new PageReference('');
        ref.getParameters().putAll(Params);
        return ref;
 }
- Once we have got the Authorization Code, the next step would be to exchange this code for an Access Token.The access token represents the grant's scope,duration and other attributes granted by the authorization grant and it also provides and abstraction by replacing the different authorization constructs like username, password.
We have to do a REST API POST call to GitHub Authorization server, post completion of which the resource server will be open to requests. Since we have already covered the If part, lets start writing for the else part.
else
{
    HttpRequest req = new HttpRequest();
    req.setBody('client_id='+EncodingUtil.urlEncode(<<Client Id>>, 'UTF-8')+'&client_secret='+EncodingUtil.urlEncode(<<Client Secret>>, 'UTF-8')+  '&code='+EncodingUtil.urlEncode(<<Authorization Code>>, 'UTF-8')+'&redirect_uri='+EncodingUtil.urlEncode(<<Redirect URI>>, 'UTF-8')+'&state='+EncodingUtil.urlEncode(<<Any Random String>>, 'UTF-8'));
    req.setCompressed(false);
    req.setHeader('Content-Type', 'application/x-www-form-urlencoded');
    req.setEndpoint('');
    req.setMethod('POST');
    Http http = new Http();
    HTTPResponse res = http.send(req);
}
Please Make Sure that you have added the above endpoint URL in Salesforce Remote Site Settings.
We can also set the content-type to JSON(application/json) and then use the Apex JSONGenerator method to add the parameters to a single JSON string and then set it as the body as the request.
Once the request is successfully sent, which we can check by using debug statement, you will see that there 3 parameters that come as a part of the response, namely, access_token,scope and token_type. We can retrieve them for future use.GitHub access tokens do not expire so we will not get any refresh token. While the scope tells us about our access scope, the token_type provides the client with the information about successfully utilising the access token for a protected resource request. The access token is the most important part of the response, for multiple use, we can either store the access token using an encryted field type in an object or use Apex Crypto API for the same. We can also initiate the flow everytime a request is to be made to avoid the storage of any sensitive information.
If you want to perform a DML operation to store the access token, please remember that it is not a best practice to perform any DML operation as a part of pageload. Alternatively, we can give a button in the page which is chosen as the redirect URI and can bind the DML operation with the same.
- Once we have the access token, it is time for the connected app to request the API on user's behalf for a protect users using the access token. It will be a GET request and the endpoint will change as will since we are directly requesting the API to open the access.
HttpRequest req = new HttpRequest();
req.setEndpoint(''+<<access_token>>);
req.setMethod('GET');
Http http = new Http();
HTTPResponse res = http.send(req);
We can always pass the access token in the URL but adding the token in the Authorization header is a better and cleaner approach.
req.setHeader('Authorization', 'token <<Access_Token>>');`
This time, the response will contain various resource types that GitHub can provide and the endpoint to access them. Let's try accessing something, how about list of repositories for starters.
HttpRequest req = new HttpRequest();
req.setEndpoint(''+<<GitHub username>>+'/repos');
req.setHeader('Authorization', 'token '+<<Access_Token>>);
req.setmethod('GET');
HTTP http=new HTTP();
HTTPResponse res=http.send(req);
The response will contain the list of all private and public repositories in the form of a JSON string depending on the scope/access provided. We can use a wrapper class to deserialize it once we know the values to be retrieved.
- Now since we are done with accessing a resource, it is time to use the connected app to make some changes in GitHub as well.Let's create a pull request in GitHub.
HttpRequest req = new HttpRequest();
req.setEndpoint(''+<<GitHub username>>+'/+<<Repository Name>>+/pulls');
req.setHeader('Authorization', 'token '+<<Access_Token>>);
req.setmethod('POST');
HTTP http=new HTTP();
JSONGenerator gen = JSON.createGenerator(true);
gen.writeStartObject();
gen.writeStringField('title','<<Pull Request Title>>');
gen.writeStringField('head','<<Branch Name>>');
gen.writeStringField('base','<<Branch Name>>');
gen.writeEndObject();
String jsonS = gen.getAsString();
req.setBody(jsonS);
HTTPResponse res=http.send(req);
Similarly you can query and create branches,user information,commits etc using API calls. The search API provided is also a wonderful way to search within GitHub based on a keyword.
Hope that the above post was informative and will help solving your GitHub integration issues. Thank you